Now available stateside, too – click here!
Build review by G1YBB. Video review in Slovenian by S53K.
DG2IAQ video test with FT-817. DG2IAQ video test with IC-7200.
Polish Youtube video presentation by SQ6NEJ. Short Spanish video by EC4TR.
 Amateurs wanting to save their voice during CQ calls know the advantages of voice keyers, also called CQ parrots. There are not many transceivers having such a nice feature built-in. Therefor many seek for external solutions.
The SBVK and FA-SM solutions featured on this website are good solutions to full-fill that task. Especially the FA station manager with it’s 4 voice memories, built-in CW keyer and sequencer is a versatile tool but rather designed to be a fixed or table portable station accessory. But what to use when go hiking or being mobile? Due to weight (hiking) or security (mobile) reasons an external box is probably not the right solution. Even for home use some might prefer not to have an additional external box that needs to be wired and takes up precious space on the operating desk.
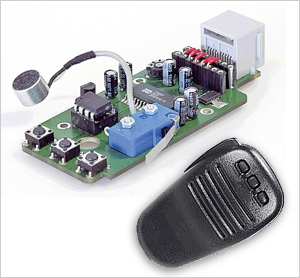
These where the reasons why I decided to develop something entirely new and not available on the market yet – a voice keyer completely integrated into a standard fist microphone! So no additional box as you need the microphone anyway. And no additional weight as the used components weigh less than the original innards of the used microphone.
Checking standard transceiver microphones available today I quickly discovered that the Yaesu MH-31 hand mic would be an ideal candidate for this project as it’s few components are soldered on a PCB that can be taken out. So I could develop a replacement PCB containing all needed components for a voice keyer. Basically it is nothing else than the SBVK but with a few design changes concerning how the ISD 1760 voice chip is controlled (using the SPI interface) and how audio is transferred to the transceiver.
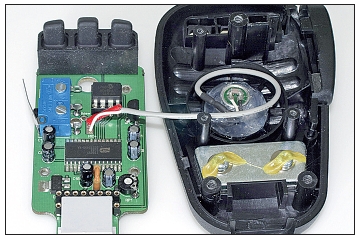
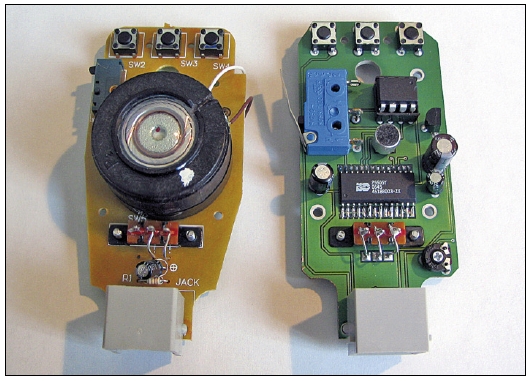 The picture on the right shows the comparison between the original MH-31 PCB left and the first prototype PCB right while above left you can see the final PCB. The prototype was designed to be an exact replacement so you could simply put it into the microphone, plug in the mic cord and attach it to a Yaesu transceiver and be done. The slider switch on the microphone’s back side was used to switch the mic’s FST button between transceiver and the PIC microcontroller.
While this worked right away I found the design to be to unflexible. If you wanted to use it with other transceivers you would need to rewire the microphone cord or build adapters. And even then you could only use it on transceivers with 5 V available on their microphone sockets. So I redesigned it again: It got a small jumper field to configure which wires of the microphone cord are used for PTT, ground, audio, up/down, etc. (that’s what you see next to the RJ-45 socket on the picture above) so you can use the original mic cord without modifications as well as a small voltage regulator to use it with transceivers with higher voltages on the mic socket, i.e. Kenwood, Icom, Elecraft who provide 8 V there instead of 5 V like Yaesu does (it works with voltages up to 16 V). Due to the additionally needed components I had to eliminate the sliding switch, too, wiring the FST button directly to the microcontroller. The result is a solution that can be used with potentially every available transceiver on the market today. You can find a German description in the FUNKAMATEUR magazine, issue 2/11, where I introduced the MH-31 voice keyer to their German speaking readers.
FUNKAMATEUR decided afterwards to produce a commercial kit. It is available from their webshop in two variants: BX-184 is the replacement PCB for those who already own an MH-31 microphone. Kit BX-184M includes an MH-31 besides the PCB for those not owning one yet, i.e. users of other brand transceivers. In both cases all SMD components are pre-soldered to the PCB so only a hand full of through-hole components need to be soldered by the customer. Step-by-step instructions are available, either in English (Quick Assembly Guide) or German (Baumappe). Ordering from outside the EU is easily done through Paypal, see their instructions on their product website. And they have a special US webshop, too. Alternatively contact them by mail or telephone to place your order. They will be glad to help you.
A few additional explainations besides the Quick Assembly Guide. There’s a small 1 nF SMD capacitor in the kit that needs to be soldered directly onto the electret capsule included in the kit. This is to avoid RF feedback (besides the other measures taken on the PCB itself). Furthermore there is a small 470 Ohm resistor in the kit, too. If you want to use the microphone with any Icom transceiver you need to solder it onto the PCB’s back where R7 is marked. This is needed as Icom is routing both UP and DOWN keys through one line to the transceiver while Yaesu, Kenwood, Elecraft, etc. use separate lines.
 A few examples of how to configure the mic cord jumper matrix are included in the instructions. For all other cases please check the pin assignment in your transceiver’s manual. If you only want to use it with one transceiver it’s probably better for long term contact stability to directly solder the jumper wires to the PCB instead of using the receptacles (although I have not seen any trouble at all with the jumper wires during the 3 years I’m using it myself).
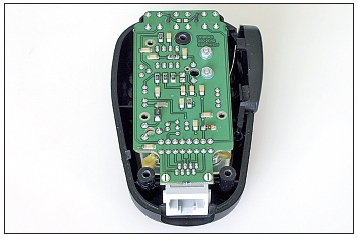
It is essential to hot-glue the included electret capsule to the microphone shell. While doing it make sure that you glue also the openings left and right of the capsule. This is important to avoid voice getting into the microphone behind the electret capsule what would result in echos within the mic enclosure and bad audio. Doing it as shown above will eliminate this potential problem entirely.
The PTT lever needs to be bend slightly into the direction of the blue switch to ensure it only closes contact when the enclosure’s plastic PTT lever is pressed. It’s just a millimeter and best tested when put into the microphone shell. Before screwing the PCB to the microphone shell make sure you inserted the rubber pads for the DWN/FST/UP buttons again. I know what I’m talking about, I’ve forgotten it myself probably a thousand times. 😉
Now how does it all work? Well, it’s quite simple. The CQ parrot is controlled by the FST button on the microphone in the middle between the DWN and UP buttons. The following functions are available:
- To record a message hold down the FST button for 2 to 3 seconds. Afterwards press the PTT and talk your CQ call into the microphone. The message may be up to 60 seconds long. Recording is stopped after releasing the PTT key again.
- To play the message once simply press the FST button briefly. PTT is generated automatically. You can abort by pressing the PTT key.
- To play the message in a loop hold down the FST key for 0,5 to 1 second. After a short delay the message starts playing, PTT is generated automatically. When finished PTT is released and the voice keyer waits for the configured delay time and starts all over again. The loop is infinite. To stop it simply press the PTT key, no matter if the message is currently playing or if the voice keyer is in pause mode.
- You have the choice between 3 different pause times, i.e. delay between repeated CQ calls in play loop mode. Initially a pause time of 3 seconds is set. You can change that to 6 seconds by holding the PTT key down and pressing the FST button for 1 second. If you want to change from 6 to 10 seconds delay time simply repeat the procedure. Having 10 seconds configured and doing the mentioned procedure again will change from 10 to 3 seconds. So as you can see the pause time selection happens circularly. It is stored in the microcontroller’s EEPROM and does not need to be reconfigured each time you use the microphone again.
I have tested the MH-31 CQ parrot myself with the following transceivers: Yaesu FT-817, FT-847, Icom IC-706MkIIG, IC-7000, Kenwood TR-751, TS-2000 and the Elecraft K3. Feedback from kit builders confirmed that it works with a FlexRadio Flex-1500 SDR transceiver, Elecraft K2, Icom IC-7200 and Yaesu’s FT-857/897 flawlessly, too.
 Please let me know what transceivers you are using your MH-31 voice keyer with:
 ![]()
All other feedback is welcome, too.
I hope you enjoy building this easy yet powerful kit yourself and have fun operating the microphone with integrated CQ parrot. I am sure this is quite a worthwhile addition to every station, be it fixed, portable or mobile. It already helped me producing better contest results using low to medium power equipment (mobile and portable mountain topping) during a few of the DARC contests. Of course it will work very well with a high power station, too. 😉
Finally please take a look at eHam.net to see what others have to say about the kit. Posting your own experience with the kit on eHam.net would be much appreciated, too. Many thanks in advance!